

Inclusioncraft nitty-gritty, part two
Inclusioncraft nitty-gritty, part two
soaking nibs, infusing cocoa butter, and other insights on tweaking ingredients added during refining
When I set out to create my first inclusion bar I had no guidance or how-to’s or insights from fellow makers, no bars to unwrap and look at to try to answer How did they do this? There were zero inclusion bars on Instagram, and in 2014 the Insta community was teensy. I winged it, and it worked, but only because the inclusions I chose~~and the timing of adding those inclusions~~were basic enough it would have been hard to screw it up (tempering was a whole other matter in those early days).
Remember rule n1 from yesterday’s post?
The one true rule for an Inclusioncrafter to craft by: each choice we make must be intentional.
I didn’t know it at the time, but that was the path I’d set my inclusioncrafting compass to. I paired a few simple ingredients to origins that I’d made batches of chocolate from, because something in the flavor of those batches sparked the thought “this would taste great with ____” I don’t know where these thoughts come from. If inspiration doesn’t come easily to you that’s okay, but it’s an integral skill to making craft chocolate, no different from excelling at tempering or tasting assessment or creating roast profiles. These take time and dedication. Note that I say integral to craft chocolate: chocolate focused on efficiency + productivity goals is limited in its creative potential by the processes and machines required. Something to consider when scaling is, if you have built a thriving chocolate biz through inclusion bars, what impact on your product line will an automated tempering or bar depositing process have? I owe a debt of gratitude to Clay Gordon for refusing to sell me a very large tempering machine he repped, pointing out to me how it would NOT help me make more of what I did best.
The number one mistake made in Inclusioncrafting is copying someone else’s work. By copying I mean, seeing another maker or big craft company sprinkling nibs onto the back of a bar and thinking that’s all there is to it, or “that’s what an inclusion bar is” with no thought to the origin of the batch the %, the type of chocolate, the origin of the nibs, the roasting, the ingredients. This sums up yesterday’s post in a tidy cacao pod shell, and I am repeating it because there is so.much.repetition of “ideas” in chocolate.
This is what I mean by intentional. You can do this, no matter where you are as a maker. It doesn’t require a long career in making chocolate. It doesn’t require a certificate or tasting course, or even having worked with a bunch of different cacao origins. It doesn’t matter what your background was BC (before chocolate). You just need to practice listening to what appeals to you, and trust it.
Here are some thoughts on the subject from Natalie of Xoconat
I know I'm not alone here. Come on, admit it.
Those crafting moments that can only be described as Maker's Block. Not very different at all from the dreaded Writer's Block. When you have your tools before you - in the case of chocolate maker's - beans, sugar, cocoa butter (or not, whatever) and a pantry full of inclusions, but - the Muse, that ephemeral and capricious mistress of inspiration is eluding you.
Even if you come to the table with an idea, many times it is impossible to wrestle it into shape- into a delicious chocolate vou're not embarrassed to share.
Keeping with the parallel of Maker's Block /Writer's Block, Annie Dillard says that you must snatch that beautiful butterfly idea from the ether and pin it to the ground, thrashing and all.
Only then, once it's pearly wings are shredded and tattered can you start the hard work of putting pen to paper, or bean to grinder.
Chocolate making is hard work.
Okay, let’s dive into the Structure of Inclusioncraft through building the base with batchcrafting.
If you have not yet made a batch of any type of chocolate using a melanger, you’ll need to know how-to’s of batchcrafting: for dark chocolate and milk chocolate (nib-based chocolate) this includes sourcing/choosing origins, pre-roast prep sorting, roasting, winnowing, creating a % formulation, the stages of refining, and batch evaluation. You can skip everything up to refining by buying/sourcing (maybe you know a chocolate maker?) ready-to-go roasted nibs, and also return to these lessons later. If you’re a chocolatier, and plan to use couverture you source for inclusioncrafting, or if you don’t make nib-based chocolate, much of this will definitely be useful nonetheless.
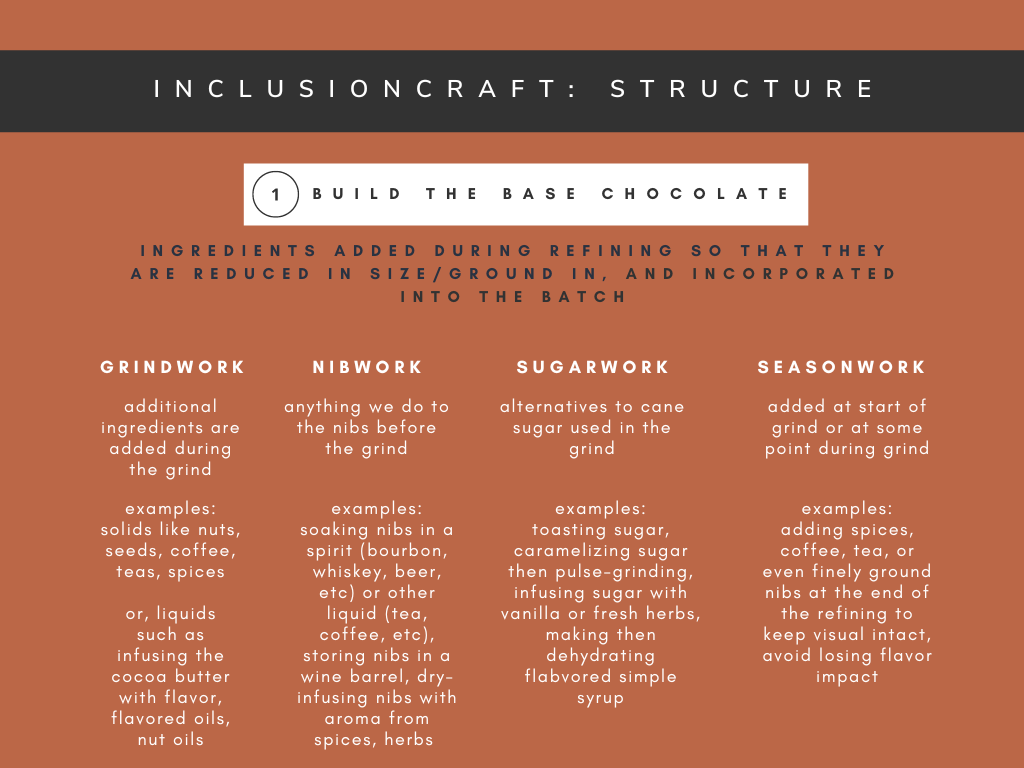
Our inclusions can come into our batch/bar at different stages of our process. When we design the base chocolate we have options for “how” we’ll get flavor into our batch: grindwork, nibwork, sugarwork, seasonwork. This can be used alone or with other inclusions later, added at temper.
Building the base chocolate happens when the chocolate batch is refined (ground into liquid chocolate) in the melanger: the nibs, sugar, cocoa butter, milk powder if using or a plant-based milk powder, fruit powder, flavorings, etc etc etc. It’s probably the least apparent inclusioncrafting method, because the inclusions “become” a batch of chocolate. However, it can be an important part of a bar design: if we want to make a toasted white bourbon milk chocolate bar with toffee shards, we’ll need to:
soak the nibs for our milk chocolate in bourbon, then dehyrdate;
toast the milk powder before we add it to our grind;
and of course, make the toffee we’ll be stirring in at temper.
We know that a basic dark chocolate is made with nibs + sugar + cocoa butter (or nibs + sugar or, if a 100% dark bar, just nibs and maybe cb if the maker chooses) but! if we add roasted peanuts into the melanger with our nibs etc we’re making a peanut butter dark chocolate. If we add peanuts to a milk chocolate: a peanut butter milk chocolate is what we’ll create. Peanuts + milk powder or plant-based milk + sugar: a peanut butter white chocolate. This is grindwork.
Grindwork is what we’re doing when we make a batch of strawberry white chocolate (we add freezedried strawberry powder), or toast the milk powder for a toasted dark milk chocolate, infusing cocoa butter, or grind almonds into a batch of dark chocolate: we are going beyond the basics and grinding in extras.
infusing cocoa butter: if using a “hard” or woody ingredient to infuse (cinnamon sticks, vanilla beans, cloves, etc) the cocoa butter formulation amount for your batch is all you’ll need. If using a “soft” ingredient (that can soak up cocoa butter), like rosebuds or herbs, add 5% more cocoa butter to the batch amount. Melt the cocoa butter in a deep enough container to hold all of it plus the ingredient you’re infusing. The cocoa butter must be kept warm enough to not harden; a sous vide works great for this, or a chocolate melter. Infuse until you’ve reached the flavor intensity you need, strain, and use the cb in your batch. I often get asked “how long” but the truth is, spices and cocoa butter vary, and of course, our personal palates are different! Taste, experiment, repeat.
A quick video of infusing cocoa butter. It’s so easy, if you haven’t used this as a way to bring in flavor (and sometimes, color) you’ll love it. It’s useful for any type of chocolate.
Nibwork, sugarwork, seasonwork are ways of thinking. Just as inclusions are often mistaken for “something sprinkled on the back of a bar,” makers often mistakenly think of dark chocolate as being nibs + sugar + cb (or no cb). But what if we soak the nibs in bourbon (then dry them) + toast the sugar + infuse the cocoa butter with vanilla beans?
If a melanger is used it’s grindwork.
Inclusions can be added to the grind and refined in the melanger, as we’ve just discussed, or we can start with an already-made, finished batch of chocolate then add flavor by melting the chocolate and re-refining with the inclusion. Either way, ingredients are added while the chocolate is in the melanger.
Adding inclusions later is good for flavors that are mild or might be lost through the longer grinding process, is an ideal way to make use of (and change!) small amounts of chocolate from prior projects, and works well to add texture + flavor that would otherwise be refined into too-small particles. Have you ever wondered if you could make a milk chocolate by combining a batch of dark with a milk batch? or what would happen if you took that small batch of coffee oat milk white and added it to a dark batch? Part of the standard thinking is create batch formulation → add to melanger → refine → store or temper. But once we have a batch, big or small, we can use it for some other purpose.
This earlier lesson harkens to this idea with white chocolate; scroll the post to find the lesson how-to’s.

So, what can be added in after the batch has been made?
Anything that will not wreak havoc on viscosity, though adding extra cocoa butter is an option as long as mouthfeel is kept in mind. Nuts work well because they won’t require extra cb (but they’ll add fat and increase flow). Spices, coffee, teas also work well.
More nibs and/or sugar: won’t work as they won’t refine smoothly unless! your bar idea is a sandy nibby creation.
The method for option two: chocolate is melted and then poured into a melanger; the extra ingredients are added and refined as long as needed, depending on flavor and texture goals.
Nibwork
Treatments to nibs before adding to the grinder; nibs are immersed or steamed for a length of time and then used in the initial grind.
Examples: Dry--barrel aging in bourbon casks, wine barrels, or storing/layering nibs amongst herbs, such as rosemary. Wet--immersion and/or steaming in liquids such as bourbon, vodka, wine, vanilla, coffee, teas, sugared beverages (colas), fruit juices
Soaking nibs: weigh the amount of nibs needed for your batch, weigh the liquid. How much liquid to use is determined by the intensity you’re aiming for, and the length of time you will soak the nibs. IT’s NEVER TOO EARLY to get soaking! Choice of origin matters, as does freshness. Soaking is an ideal way to use nibs that have lost vibrancy. After soaking, drain + re-weigh nibs; compare to original dry weight. If you have a dehydrator, dry them well, or use an oven set to low. The nibs must be as dry as possible before making the batch.
Sugarwork
Includes choosing alternatives to traditional cane sugar, and techniques used to alter the sugar flavor that we will use to build our batch.
Examples: coconut sugar, maple sugar, panela, toasting sugar, infusing sugar with herbs/spices, caramelizing sugar then milling before dding to the grind.
Seasonwork
Flavor added at initial grind or late in grind to add flavor, texture, both.
Examples: coffee/espresso, tea, spices, shredded coconut, dried herbs, , salts (remember, salt is not fat soluble, meaning it won’t dissolve if it’s stirred into a batch), etc
Next up: what comes after we understand structure? we start designing bars, then the how-to’s of adding inclusions at tempering.
Happy crafting,
Mackenzie
"When I set out to create my first inclusion bar I had no guidance or how-to’s or insights from fellow makers, no bars to unwrap and look at to try to answer How did they do this?"
OMG that sounds just like me, except I'm in the jungle.
The toasted white bourbon bar sounds so good!